To add finishes to your project do the following:
Step 1 - On the Projects List View screen click on the line containing the project you wish to add finishes to.
|
Step 2 - Click on Finishes in the Main Menu Bar
Step 3 - Define the levels in the project.
Click on the Levels button (1).
The pop up window will appear without any levels as shown (2).
Enter at least one level for your project. Examples are First Floor, 1st Floor, Ground Floor, Basement....
Enter all the levels that will have finishes.

For this example we will enter 1st Floor and 2nd Floor

Step 4 - Once the levels are defined, click on the + New Finish button.

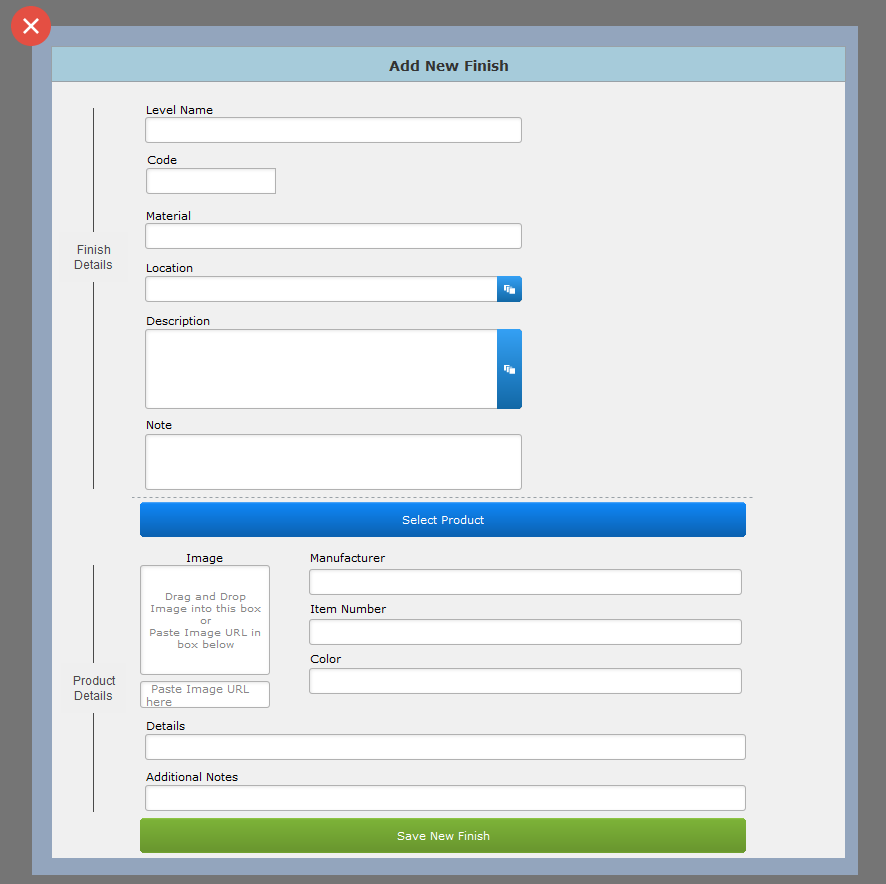
Step 5 - Enter the fields of information shown in the image below.

Finish details - these details are only related to the finish
| Item Name | Use the pull down to select from the levels you entered in Step 4. |
| Code | This field is optional and refers to the building codes that you can set up in the Systems Preferences Area. |
| Material | If you are using building codes, this field will populate for you automatically. |
| If you are not using building codes, you will need to enter the material such as Paint, Plastic Laminate, Vinyl Tile |
| Location | Click on the blue button to view the areas for this project. Select the appropriate areas. You can also type into this field. |
| Description | Click on the blue button to view the surfaces that were set up in the System Preferences. You can also type into this field. |
Product details - these details are linked to the product and will appear again if this product is selected for another finish
▪If you have already created a product that you want to use for this finish, then click the blue Select Product button.
▪If you need to enter a new product for this finish, then enter the fields below
| Image | Adding images works the same way it does when you add an image to an item. To learn more about adding images, click here. |
| Manufacturer | Select from a list of manufacturers that are already set up in the Address Book. |
| You cannot add manufacturers from this layout. If you need to add a manufacturer, then you will need to go to the Address Book to do so. |
| Item Number | You can enter any alphanumeric data you need in this field. |
| Color | Enter the color here. |
| Details | Enter the details here. Each firm will determine what information they will want to enter here. |
| Additional Notes | Enter additional notes here. Each firm will determine what information they will want to enter here. |
Click the green Save New Finish button when ready.
|